Your neck shouldn’t hurt after a one-hour meeting. But for millions of people, it does — because someone mounted that conference room display about six inches too high, and nobody questioned it. You spend the entire call tilted back, staring up at a screen like you’re watching a movie from the front row, and you walk out with a stiff neck wondering if it’s just stress. It’s not stress. It’s a mounting height problem.
Here’s the direct answer: the ideal conference room monitor mounting height places the screen center between 57 and 65 inches from the floor, aligned with seated eye level for most adult participants. The bottom edge should sit at least 48 inches off the ground, the downward viewing angle from eye level to screen center should not exceed 15 degrees, and for rooms under 20 feet deep, a single display almost always outperforms a dual-screen configuration in terms of consistent sightlines across the table.
Wrong monitor placement doesn’t just cause discomfort. It degrades hybrid meeting quality when a PTZ camera is misaligned with participant faces, it can put you in violation of ADA Standards for Accessible Design if wheelchair users can’t see the screen clearly, and it quietly kills meeting engagement in ways that no amount of Microsoft Teams Room or Zoom Room software can fix. The VESA mount standard tells you how to attach the bracket. It doesn’t tell you where to put it on the wall. That gap is where most conference room AV setups go wrong.
This guide fixes that. You’ll find step-by-step calculations for every common room type, specific adjustments for boardrooms versus huddle spaces, hybrid camera alignment with your display, ADA compliance requirements spelled out plainly, and a breakdown of every mounting option — from a basic tilt mount and wall mount bracket to a motorized height-adjustable mount, ceiling drop-down mount, and rolling display cart — so you can make the right call for your exact setup.
The Quick Answer: Ideal Conference Room Monitor Mounting Height at a Glance
Mount the center of your conference room display between 57 and 65 inches from the floor. That’s the standard that works for most rooms with seated viewers.
Here’s the short version: seated eye level runs roughly 42–48 inches from the floor. Add a slight downward viewing angle — the 15-degree downward viewing angle rule is the ergonomic benchmark — and your screen center lands right in that 57–65 inch range. Bottom edge of the display should clear at least 48 inches from the floor to satisfy ADA Standards for Accessible Design and keep sightlines open for everyone at the table, including wheelchair users.
Room depth changes things. A display in a 30-foot boardroom sits differently than one in a 12-foot huddle space — screen-to-viewer distance directly affects how high feels comfortable versus strained.
A tilt mount helps. Even a 5–10 degree tilt compensates when ceiling height or structural constraints push the screen higher than ideal. Keep that in mind before finalizing your wall mount bracket position.
Why Mounting Height Matters More Than You Think
Most people treat monitor placement as an afterthought — bolt it to the wall, plug it in, done. That’s a mistake that compounds over time, both physically and operationally.
Neck Strain and the Long-Term Health Impact of Incorrect Monitor Height
Your neck isn’t designed to hold a sustained upward angle. Even a modest 15-degree upward tilt increases the effective load on your cervical spine significantly — some biomechanical studies put the perceived weight on neck muscles at nearly double what it is at a neutral position. Now multiply that across a 90-minute board meeting. Then multiply it across every meeting that week.
The ergonomic monitor placement standard exists for a reason. Seated eye level sits between 42 and 48 inches from the floor for most adults. The 15-degree downward viewing angle rule — where your eyes drop slightly below the screen’s center — is what keeps neck muscles in a relaxed position. That puts the screen center height ideally between 57 and 65 inches from the floor for a standing or mixed-use room, but it needs to come down for rooms where everyone stays seated the entire time.
Mounting a 75-inch display with its center at 72 inches looks dramatic. It also guarantees neck pain by the end of the quarter.
The problem cuts the other way too. Mount the display too low and people in the back rows can’t see over the heads of colleagues in front. Neither extreme is neutral. You’re always trading one discomfort for another unless you actually do the math for the specific room.
ADA compliance adds a hard floor to this conversation. Under the ADA Standards for Accessible Design, interactive displays must maintain a bottom edge clearance of at least 48 inches when operable components are involved. That’s a minimum, not a target. Wheelchair users need sightlines too, and a display mounted so its bottom edge clears 48 inches while the top disappears toward the ceiling doesn’t solve the accessibility problem — it just satisfies the letter of the rule.
If your organization uses motorized height-adjustable mounts or a ceiling drop-down mount system, you actually have the flexibility to serve both standing and seated audiences. Most rooms don’t have that. Most rooms have a fixed wall mount bracket with a tilt mount, and whoever installs it sets the height once.
Get it wrong once. Live with it for five years.
How the Wrong Mounting Height Kills Productivity in Hybrid Meetings
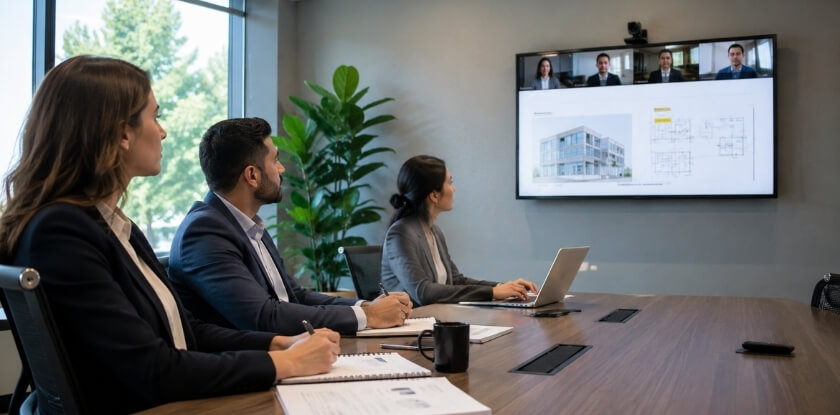
A hybrid meeting room introduces a variable that a traditional boardroom AV setup never had to handle: the remote participants on screen need to make eye contact with the people in the room. That only works if the display and the PTZ camera are positioned relative to where people are actually looking.
Here’s what happens in practice. The display goes up too high — say, 70 inches to center — and the people in the room naturally tilt their heads up to watch it. The PTZ camera, mounted just above or below the display, now captures everyone from a below-chin angle. Remote participants on a Microsoft Teams Room or Zoom Room call see the ceiling, the underside of conference table lighting, and a lot of nostrils. Nobody’s maintaining “eye contact.” The whole point of the hybrid setup collapses.
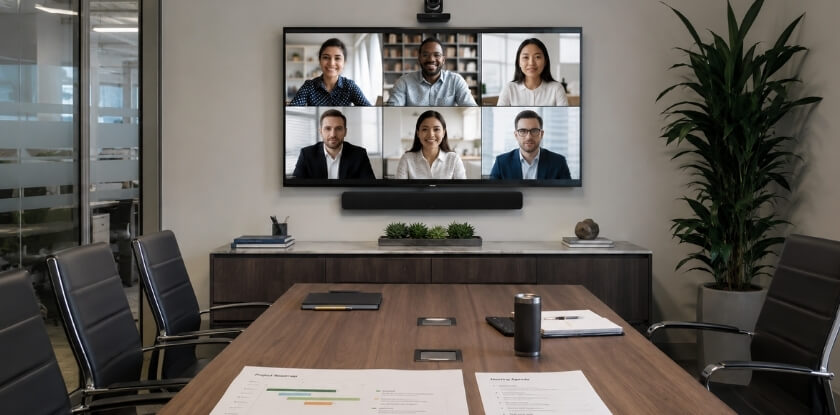
It gets worse with a single vs. dual display configuration. In a dual display setup — one screen for content sharing, one for video participants — the camera placement relative to the participant screen becomes even more critical. If that second display is too high, remote attendees become an afterthought that participants have to crane their necks to acknowledge. That changes meeting dynamics in ways that are subtle but real. People stop looking at remote participants. Remote participants feel it.
Screen-to-viewer distance matters here too. A 16:9 aspect ratio display that works fine at 8 feet starts to lose facial legibility for remote participant thumbnails beyond 12 feet if the screen is undersized or mounted at an angle that introduces glare. Glare and ambient light control is a whole separate problem, but incorrect height makes it worse — tilt mounts help, but they’re compensating for a positioning error, not solving it.
A rolling display cart or floor-standing display stand is genuinely underrated for rooms that host different meeting types throughout the week. Height is adjustable, position is adjustable, and you’re not locked into a single configuration that half your use cases don’t fit. The tradeoff is cable management and stability. For a dedicated conference room with consistent usage, a properly calculated fixed wall mount is the right call — but only if the height calculation is done before installation, not after.
The Science Behind Eye-Level Viewing for Conference Displays
Human eyes aren’t neutral instruments. They have preferences baked in by anatomy, and ignoring those preferences means fatigue, neck strain, and distracted participants — none of which help your meetings run well.
What Is the Ideal Viewing Angle? The 15-Degree Rule Explained
The 15-degree downward viewing angle rule comes from decades of ergonomic research, much of it applied to workstation monitors before it migrated into commercial AV and boardroom AV setup standards. The principle is straightforward: your eyes should look slightly downward — roughly 15 degrees below horizontal — when resting on the center of the screen.
Why downward? Because that’s the natural resting position of the human eye when your neck muscles are relaxed. Looking straight ahead requires subtle muscle engagement. Looking upward is worse — it strains both neck extensors and the muscles around your eyes, and it pulls your head back into a position that compresses the cervical spine. Even 20 minutes of that posture in a conference room creates noticeable discomfort.
In practice, the 15-degree rule translates directly into mounting math. If seated eye level for your audience sits between 42 and 48 inches from the floor — which covers most adult populations in standard office chairs — your screen center should land slightly above that range to produce the correct downward gaze. That calculation puts the screen center in the 57–65 inch zone for the majority of conference room setups.
Here’s where people get it wrong. They hear “15 degrees downward” and mount the screen too high, thinking more downward angle equals better ergonomics. It doesn’t. Past 20–25 degrees of downward tilt, you’re now craning your neck forward and down, which creates a different set of problems. The 15-degree target is a ceiling, not a floor.
A tilt mount helps you fine-tune this after installation. Most VESA mount standard-compatible tilt brackets offer between 5 and 15 degrees of vertical adjustment, which gives you some correction room if your initial mounting height is slightly off.
Eye Level vs. Screen Center: What the Numbers Actually Mean
“Mount it at eye level” is advice that sounds precise and isn’t. Eye level of whom? Seated or standing? And which part of the screen?
Let’s be specific.
Seated eye level for a typical adult ranges from 42 to 48 inches off the floor. That’s the measurement taken from floor to eye when someone’s sitting upright in a standard task chair. Taller people and higher chairs push that toward 48 or beyond. Shorter individuals and lower seating drop it toward 42. For a mixed audience in a conference room, you’re designing for a population, not one person — so the midpoint around 44–46 inches is a reasonable baseline.
The screen center is a different measurement entirely. Screen center refers to the physical midpoint of the display panel, top to bottom. For a 65-inch 16:9 aspect ratio display, that midpoint sits roughly 28 inches above the bottom edge of the panel. That’s just geometry.
Now combine the two numbers. If you want the screen center at 60 inches from the floor — squarely in the 57–65 inch recommended range — the bottom edge of that 65-inch display would sit at approximately 32 inches. But minimum bottom edge clearance for ADA compliance under ADA Standards for Accessible Design requires 48 inches from the floor for wall-mounted objects protruding more than 4 inches. That creates a real conflict in some configurations, and it’s a conflict you need to resolve before drilling anything into the wall.
The practical solution in many rooms is either a ceiling drop-down mount or a motorized height-adjustable mount. A ceiling drop can position the screen center at the ergonomically correct height while keeping bottom edge clearance compliant. A motorized mount lets you adjust dynamically — useful if your conference room doubles as a training space where participants sometimes stand.
One more thing worth tracking: screen-to-viewer distance affects how critical your vertical placement is. At 8 feet of viewing distance, a 3-inch error in mounting height is largely irrelevant. At 15 feet, the angle shifts enough to matter. The closer your viewers sit to the display, the more precise your mounting height needs to be.
Step-by-Step: How to Calculate the Right Mounting Height for Your Conference Room
Getting this right takes about 10 minutes of actual measuring. Most people skip the math and just eyeball it — then wonder why attendees are craning their necks six months later.
Step 1 — Measure Your Audience’s Seated Eye Level
Grab a tape measure. Have someone sit in the chairs that will actually be used in the room — not a random office chair pulled from a hallway.
Measure from the floor to their eye level while seated naturally. Don’t ask them to sit up straight like they’re at a military inspection. People slouch in meetings. That’s the reality you’re designing for.
For most standard office chairs, seated eye level lands between 42 and 48 inches from the floor. If your room has a mix of chair types, measure three or four and average them. If wheelchair users will regularly attend meetings in this space, that range holds — seated eye level for wheelchair users typically falls around 43–45 inches, so ADA compliance and general ergonomic placement aren’t far apart.
Write that number down. Everything else builds from it.
Step 2 — Factor In Screen Size and VESA Mount Dimensions
Here’s where people make the first real mistake. They calculate mounting height based on screen diagonal without accounting for how tall the panel physically is.
A 65-inch display in a 16:9 aspect ratio is roughly 32 inches tall and 57 inches wide. A 75-inch display jumps to about 37 inches tall. That’s a 5-inch difference that directly affects where your center point lands.
Check the manufacturer’s spec sheet for the exact panel height — not the diagonal measurement. Then look at the VESA mount standard hole pattern on the back of the display. VESA mount patterns are typically centered on the panel, but on some commercial displays they sit slightly above or below true center. If you’re using a tilt mount or a ceiling drop-down mount, the bracket itself adds a few inches of offset between the wall anchor point and where the screen actually hangs.
Measure the bracket’s drop distance before you drill anything. Motorized height-adjustable mounts need even more lead time here because the installation range has upper and lower limits.
Step 3 — Calculate Optimal Center Height and Bottom Edge Clearance
The target zone for screen center height is 57 to 65 inches from the floor. That range covers most room configurations and keeps the display within a comfortable viewing angle for seated attendees.
Here’s the simple formula:
Screen center height = Seated eye level + 10 to 15 inches
If your seated eye level average is 44 inches, you’re targeting a screen center somewhere around 54–59 inches. That lands at the lower end of the recommended range, which is fine — slightly lower is better than too high.
Now calculate the bottom edge:
Bottom edge = Screen center height − (panel height ÷ 2)
Using a 65-inch display (32 inches tall) with a center height of 58 inches: 58 − 16 = 42 inches for the bottom edge.
That’s your floor clearance number. ADA Standards for Accessible Design and general wheelchair accessibility guidelines both point to a minimum bottom edge clearance of 48 inches for wall-mounted objects that protrude into circulation paths. If the display doesn’t protrude more than 4 inches from the wall, that rule may not apply strictly — but 48 inches is still a reasonable floor to aim for so sightlines stay clear for seated attendees in the front row.
If your math produces a bottom edge below 44 inches on a large screen, the center is probably too low. Push the center height up until the bottom edge clears 46–48 inches.
Step 4 — Adjust for Screen-to-Viewer Distance and Aspect Ratio
Distance changes everything. A mounting height that works perfectly for someone sitting 8 feet away creates a steep upward viewing angle for someone at 4 feet.
The 15-degree downward viewing angle rule is your checkpoint here. From any primary seating position, the top edge of the display should not require more than 15 degrees of upward neck tilt. You can verify this without a protractor — measure the horizontal distance from the viewer to the wall, then use this: if the top edge of the screen is more than 27% of that horizontal distance above the viewer’s eye level, the angle is too steep.
For a typical small conference room with viewers sitting 8 feet from the display, the top edge shouldn’t be more than about 26 inches above seated eye level. On a 32-inch-tall panel, that means the center sits roughly 10 inches above eye level — right in the target range.
Longer rooms need higher placement, but not dramatically so. The 16:9 aspect ratio helps here because wide displays don’t need to be mounted as high as older 4:3 formats to deliver the same perceived image size.
One more thing: if you’re building out a hybrid meeting room with a PTZ camera mounted above or below the display, factor that into your layout before finalizing mount height. In a Microsoft Teams Room or Zoom Room setup, camera position relative to screen center affects whether remote participants appear to make eye contact. That’s a separate calculation, but it shares the same wall real estate — and it’s a lot easier to sort out on paper before the wall bracket goes in.
Monitor Mounting Height Adjustments for Different Room Setups
Room size changes everything. A height that works perfectly in a six-person huddle space will leave people in the back row straining their necks in a 30-seat training room. Here’s how to approach each scenario without over-engineering it.
Small Conference Rooms (4–6 People)
These rooms are the easiest to get right — and the most commonly botched because people assume any height is “close enough.”
In a small conference room, your viewers are typically seated 6–10 feet from the display. At that distance, a 55–75 inch screen is standard, and the screen center should sit between 57 and 62 inches from the floor. That keeps the display within the ergonomic sweet spot for seated eye level, which runs 42–48 inches depending on chair height and the person sitting in it.
One thing that catches installers off guard in small rooms: the table itself. Conference tables in 4–6 person rooms often sit tight against the wall, which means the display ends up closer to the front row than expected. If your nearest viewer is under 6 feet from the screen, drop the center height toward the lower end of that 57–62 inch range. Craning upward at a 75-inch panel from 5 feet away is genuinely uncomfortable.
A standard tilt mount handles this setup well. Set it with a slight downward tilt — the 15-degree downward viewing angle rule applies here — so seated viewers aren’t looking at the top half of the panel. VESA mount standard compatibility on the bracket is non-negotiable; don’t assume the mount fits your display without checking the VESA pattern first.
ADA compliance matters even in small rooms. If any participant uses a wheelchair, the bottom edge of the screen needs to clear 48 inches from the floor, and interactive elements on the display need to be reachable. The ADA Standards for Accessible Design spell this out clearly, and it’s not optional if the building is subject to ADA requirements.
Medium Boardrooms (8–14 People)
Medium boardrooms introduce the problem of depth. You’ve got people sitting 8–18 feet from the screen, and if it’s a long rectangular room, the back row is seeing a meaningfully smaller image than the front row.
For these rooms, screen center height typically lands between 60 and 65 inches. You can push toward the higher end because back-row viewers are farther away, and the angular offset becomes less of an issue at greater distances. What you don’t want is to mount so high that front-row attendees are looking up at a steep angle for a 90-minute board meeting.
Dual display configurations are common in boardrooms this size. In a single vs. dual display configuration, each screen handles roughly half the room’s width. When you go dual, keep both screens at the same center height — obvious in theory, sloppy in practice when two different installers work opposite walls.
This is also where hybrid meeting room needs start dominating the conversation. A boardroom running Microsoft Teams Room or Zoom Room needs the display and the PTZ camera to work together. The camera should be at or near eye level for remote participants, which usually means mounting it just above the display or on the display itself. If the screen center is at 63 inches and your seated eye level is around 45 inches, a camera mounted at the top bezel of that display is sitting at roughly 70+ inches — too high for a flattering camera angle. Factor that in before you finalize the mounting height.
Glare and ambient light control hit hardest in boardrooms with windows. If the room has natural light on the same wall as the display, a ceiling drop-down mount can position the screen away from the brightest ambient zones.
Large Training Rooms or All-Hands Spaces (15+ People)
Large rooms require you to stop thinking about individual viewer positioning and start thinking about sightlines across a population.
With 15 or more people, you’re often dealing with tiered seating, rows of chairs, or a mix of tables and open floor space. The back row might be 25–40 feet from the screen. At that distance, you need a large enough display — or multiple displays — so the 16:9 aspect ratio actually renders readable content.
Screen center height in large training rooms typically runs 65–80 inches, sometimes higher if you’re in a room with tiered risers. The front row is your constraint. Even if back-row viewers benefit from a higher mount, front-row viewers sitting 10–12 feet from the screen can’t comfortably look up at an 80-inch panel centered at 80 inches. The fix is either angling the display down aggressively with a tilt mount, or accepting a compromise center height around 68–72 inches that works reasonably well across most of the room.
For all-hands spaces and large training environments, a ceiling drop-down mount or motorized height-adjustable mount gives you flexibility when the room serves multiple purposes — training in the morning, town hall in the afternoon. Motorized mounts are worth the cost here because manual readjustment in a large room isn’t practical.
Wheelchair accessibility in large rooms deserves explicit planning. If interactive content is displayed — polling, Q&A, anything requiring a viewer to reference the screen while also using a device — bottom edge clearance at 48 inches minimum protects access for seated wheelchair users who may be close to the screen.
Standing-Only and Mixed Standing-Sitting Audiences
Standing eye level is roughly 60–65 inches for most adults. That’s a full 15–20 inches higher than seated eye level. If you mount a display for a seated audience and then use that same room for a standing all-hands, it’s going to feel too low almost immediately.
For standing-only setups, screen center height of 68–72 inches works well. That puts the display center slightly above eye level for most people, which is actually fine for standing viewers — you’re not fighting gravity the same way you are when seated and looking up.
Mixed standing-sitting audiences are the real headache. There’s no perfect height. The practical solution is to target screen center at 63–65 inches, which is a usable compromise — not ideal for either group but tolerable for both. If the room has a front section of seated attendees and standing viewers in the back, that geometry actually helps: the seated people are closer to the screen and don’t need to look up as steeply, while standing viewers farther back are looking at roughly eye level.
A floor-standing display stand or rolling display cart works well for spaces that flip between configurations. You’re not locked into a fixed wall mount height, and a rolling display cart lets you reposition the screen entirely if the room layout changes. For permanent installs in mixed-use spaces, a motorized height-adjustable mount that shifts the display 12–18 inches vertically is a genuinely useful investment. It’s not cheap, but it solves the problem correctly instead of compromising everyone slightly.
One more thing on boardroom AV setup for mixed audiences: if the room runs video calls while some attendees are standing, your PTZ camera placement gets complicated fast. A camera mounted at seated eye level captures standing participants from the waist down. Position it higher — 60–66 inches — so it covers both groups reasonably well, and use a PTZ with a wide field of view to handle the variation in viewer positions.
Hybrid Meeting Room Setup: Special Monitor Height Considerations
Hybrid meeting rooms break most of the standard mounting height rules. When half your participants are remote and the other half are sitting around a table, you’re not just optimizing for the people in the room — you’re optimizing for two completely different viewing experiences at the same time. That tension creates real problems if you don’t plan for it deliberately.
Camera Placement Relative to Monitor Mounting Height
In a traditional conference room, you mount the monitor, done. In a hybrid setup — whether that’s a Microsoft Teams Room, a Zoom Room, or a custom boardroom AV setup — the PTZ camera placement and the monitor mounting height have to be figured out together. One affects the other in ways that most installers don’t think through until they’re standing on a ladder with a drill in their hand.
Here’s the core conflict: the screen center height that works ergonomically for seated participants (typically 57–65 inches from the floor) often puts the camera in a terrible position relative to where remote participants appear on screen.
If you mount the camera above the display — which is common — and your remote participants’ faces appear in the lower two-thirds of the screen, the camera is looking down at an angle that doesn’t match where local attendees are actually directing their gaze. The result is a conversation that feels slightly off. Nobody can quite explain why. It just feels disconnected.
A few specifics to work with:
- Camera above the display: Works best when the screen is mounted at or slightly below the standard ergonomic range (screen center around 54–58 inches). This pulls the camera closer to the eye line of seated attendees looking at remote faces on screen.
- Camera below the display: Rare in practice, but useful in rooms with very high ceilings or ceiling drop-down mounts where the screen position is forced higher than ideal. The upward camera angle is unflattering and should be avoided unless a motorized height-adjustable mount or a floor-standing display stand lets you drop the screen center down toward 54 inches.
- Camera integrated into the display bezel: Increasingly common in purpose-built conference room displays. Alignment is handled by the manufacturer, but you still need to verify the mounted height keeps the camera within roughly 8–12 inches of seated eye level (42–48 inches from the floor for the average seated adult).
If you’re using a rolling display cart or floor-standing display stand for flexibility, you get more freedom to adjust. Set the screen center at 56 inches, mount the PTZ camera directly above the bezel, and the camera lens ends up around 66–68 inches — close enough to seated eye level that the angular difference becomes negligible beyond 8 feet of screen-to-viewer distance.
The Eye Contact Illusion: Why Camera and Screen Alignment Matters
Eye contact in video calls is already a compromise. True eye contact would require the camera to sit directly behind the screen — which doesn’t exist in standard hardware outside of a few specialized teleprompter-style rigs. So you’re always working toward an approximation.
The goal is minimizing the angular gap between where the camera is and where remote participants appear on screen. The smaller that gap, the more natural the interaction feels.
Here’s a practical way to think about it. If a remote participant’s face appears at roughly the center of a 75-inch 16:9 display mounted with its center at 60 inches, their face is at 60 inches. Your PTZ camera mounted directly above the top edge of that screen is sitting at approximately 75 inches (accounting for the screen’s vertical dimension and the wall mount bracket). That’s a 15-inch vertical gap. From 10 feet away, that gap creates a downward viewing angle of about 7 degrees. Noticeable, but tolerable.
Push the screen center up to 68 inches (which some installers do in rooms with standing participants or in boardroom AV setups with elevated ceiling lines), and now you’ve got a camera at 83 inches — nearly 7 feet off the ground. Local participants are looking up at the screen. The camera is looking down at them. Everyone looks slightly wrong to each other. No tilt mount adjustment fixes that.
The practical fix is to treat camera placement as a constraint that works backwards to determine monitor height — not the other way around. Decide where the camera needs to be to approximate eye level for seated attendees (somewhere between 48 and 56 inches from the floor for most people), then position the display so the camera sits just above the top edge. That often means your screen center ends up lower than the 57–65 inch range cited in generic guides. That’s fine. Ergonomics for the in-room experience matter, but in a hybrid room, perceived eye contact for remote participants often matters more for meeting quality.
One more thing: if you’re running a dual display configuration — one screen for content sharing, one for remote participant video — put the camera above the participant-facing display, not the content screen. And center that participant display directly in front of the table’s focal point. A misaligned camera on the wrong screen is one of the most common and most fixable problems in hybrid room installs.
Ambient Lighting, Glare, and How They Should Influence Your Mounting Height Decision
Most mounting height guides treat the room as a perfect black box. No windows. No overhead fluorescents. No skylights dropping a shaft of afternoon light directly onto your display. Real conference rooms are none of those things, and glare is one of the most common reasons a technically correct mounting height still produces a terrible viewing experience.

Here’s the core problem: mounting height and screen angle are inseparable from your lighting geometry.
How Glare Actually Works on a Conference Display
Light hits a display surface and reflects toward your viewers at a predictable angle. If you’ve already used a tilt mount to angle the screen 5–10 degrees downward — which is standard practice for reducing neck strain and hitting that 15-degree downward viewing angle rule — you’ve also changed where reflections land.
Tilt the screen down, and ceiling light sources become a bigger problem. Tilt it up, and windows behind viewers start causing wash-out. Neither is wrong by default. It depends entirely on where your light sources sit relative to the screen.
A few specific scenarios worth knowing:
Ceiling-mounted fluorescents or LED troffers directly in front of the display — this is the most common setup in corporate conference rooms. Mounting the screen higher pushes the reflection angle down toward the table surface, which actually helps. Dropping the screen lower can redirect that reflection straight into seated viewers’ eyes.
Windows on the wall behind viewers — natural light entering from behind your audience reflects off the display back at them. Here, lowering the screen slightly and increasing downward tilt can help redirect the worst of that reflection above eye level. It’s a small adjustment, but 3–4 inches of vertical repositioning combined with an extra 3–5 degrees of tilt on a quality tilt mount can make the difference between a usable image and a washed-out one.
Skylights — the worst case. The light source moves throughout the day. If your room has skylights, no static mounting height fully solves the problem. This is where a motorized height-adjustable mount earns its cost, letting you or facilities staff shift the screen position depending on time of day.
The 57–65 Inch Center Height Range Has Some Built-In Flexibility for a Reason
The screen center height recommendation of 57–65 inches from floor isn’t a single fixed number because rooms aren’t identical — but glare management is one of the legitimate reasons to use either end of that range rather than always defaulting to the midpoint.
If your room has aggressive overhead lighting and no dimming control, mounting toward the higher end (63–65 inches center height) lets you apply more downward tilt without bringing the bottom edge below the 48-inch ADA clearance threshold for wheelchair accessibility. You’re working the geometry in your favor.
If you have good ambient light control — dimmable fixtures, blackout blinds, a properly configured boardroom AV setup — you have more flexibility to optimize purely for ergonomics and stick closer to the seated eye level range of 42–48 inches for the screen’s mid-viewing zone.
Practical Glare Testing Before You Commit to Final Mount Position
Don’t finalize your wall mount bracket position until you’ve done this:
- Set up the display temporarily at your planned height using a floor-standing display stand or rolling display cart.
- Run the room through its actual lighting conditions — morning light, afternoon light, overhead fixtures on full, overhead fixtures dimmed.
- Sit at every seat at the table, not just the center seats.
- Check for hot spots, wash-out, and direct reflections.
This takes 20 minutes. It saves you from drilling into drywall at the wrong height.
Anti-Glare Screen Treatment vs. Mounting Adjustments
Some integrators push anti-glare screen protectors or matte-finish displays as a substitute for proper positioning. They’re not the same thing. A matte coating reduces specular reflection but doesn’t fix a display that’s fighting a 400-lux ambient light environment. In Microsoft Teams Rooms and Zoom Room deployments especially, image clarity directly affects how participants read shared content and facial expressions during video calls.
Fix the geometry first. Anti-glare treatment is a supplement, not a workaround.
PTZ Camera Position Interacts With This Too
If you’re running a PTZ camera above or below the display — which is standard in most hybrid meeting room configurations — your screen height affects where the camera sits, which affects how natural eye contact looks on the far end of the call.
Mounting the screen higher to dodge a ceiling glare source might push your camera too high, creating that unflattering downward-angle look for remote participants. These trade-offs are real. There’s no universal answer, but being aware of the constraint means you can at least make an informed decision rather than discovering the problem after installation.
ADA Compliance for Mounted Conference Room Displays
Most installers treat ADA compliance as an afterthought — something to check after the display is already on the wall. That’s backwards. Getting it wrong means retrofitting, which costs more and looks worse than doing it right the first time.
ADA Guidelines for Wall-Mounted Displays: What You Must Know
The ADA Standards for Accessible Design don’t give you a single “mount your screen here” measurement. What they do give you is a set of reach range and protrusion rules that directly affect where and how you hang a display.
The critical one for wall-mounted screens: any object mounted on a wall that protrudes more than 4 inches into a circulation path must have its leading edge at or below 27 inches from the floor, or at or above 80 inches. Why? Because that 27–80 inch zone is where a cane user can’t detect an obstacle. A large display mounted in that range on a slim wall mount bracket, jutting out 3–5 inches, is a compliance problem and a safety hazard.
The bottom edge clearance minimum of 48 inches from the floor gets cited a lot in AV installation guides — but that number isn’t pulled from ADA directly. It’s more of an industry convention rooted in sightline ergonomics. ADA’s concern is protrusion and reach range, not viewing angle.
For interactive displays — touchscreens used in conference rooms for annotation, content sharing, or room booking panels mounted nearby — the forward reach limit is 48 inches maximum height and 15 inches minimum. Side reach is 54 inches maximum. If anyone in your organization uses a wheelchair, those numbers matter immediately.
VESA mount standard compatibility doesn’t automatically make a mount ADA-compliant. A motorized height-adjustable mount, however, can help satisfy both ergonomic needs and accessibility requirements at once, since it lets the display shift to an appropriate height depending on who’s using it. For rooms that double as training spaces or multi-use conference rooms, that flexibility is worth the cost.
One more thing: if your display is mounted in a corridor or shared path between rooms, the 80-inch clearance floor-to-bottom rule applies strictly. Conference room displays typically sit inside the room and aren’t in a pedestrian path, so the protrusion rules are less likely to trigger — but check your layout before assuming.
Accessibility for Wheelchair Users and Low-Mobility Meeting Participants
Seated eye level for a standing person is roughly 42–48 inches from the floor. For a wheelchair user, seated eye level typically falls between 43–51 inches depending on the chair and the individual — so it’s not dramatically different from a seated non-wheelchair user. The viewing angle math largely holds.
The real issue isn’t the screen height. It’s the room layout around it.
If your conference room display setup includes a PTZ camera positioned directly below the screen — which is standard for a Zoom Room or Microsoft Teams Room configuration — the camera lens ends up somewhere around 44–50 inches from the floor. That’s roughly eye level for a wheelchair user seated at the far end of the table. It means video calls actually capture wheelchair users at a more natural angle than they do standing participants. That’s accidental good design.
What’s not accidental: making sure wheelchair users have unobstructed sightlines to the display. A floor-standing display stand or rolling display cart placed at the front of the room can block sightlines for anyone seated low if chairs and tables aren’t arranged with adequate clearance. Same goes for dual display configurations where screens are mounted wide and angled — check that the near-side screen isn’t cutting out of view for anyone seated toward the edges in a lower chair.
For rooms where the display is also used interactively (touchscreen annotation, hybrid whiteboarding), mounting height becomes a genuine accessibility decision. A screen center height of 57–65 inches from the floor works fine for standing users, but the bottom portion of a large 65″ or 75″ display at that height sits above comfortable reach for a wheelchair user. A tilt mount doesn’t fix that. A motorized height-adjustable mount does.
If your budget doesn’t allow for motorized mounts, design the room so wheelchair users aren’t expected to interact with the display directly — make sure a laptop or tablet at the table handles their input. It’s a practical workaround, not a perfect solution, but it’s better than ignoring the issue entirely.
ADA compliance in a conference room is less about hitting one magic number and more about thinking through how different people actually use the space. Get the protrusion rules right, check your reach ranges on any interactive surface, and make sure your layout gives everyone a clear view of the screen from where they’ll actually be sitting.
Alternative Mounting Options Beyond Standard Wall Mounts
Wall mounts are the default choice, and for good reason — they’re stable, predictable, and work in most rooms. But they’re not always the right call. Room geometry, furniture layouts, lease restrictions, and accessibility requirements all push some installations toward different hardware. Here’s what your actual options look like.
Ceiling Drop-Down and Flip-Down Mounts
If your conference room has a dropped ceiling and no usable wall space directly in the sightline of seated viewers, a ceiling drop-down mount solves the problem neatly. The display hangs from an adjustable pole — usually aluminum — that lets you dial in the exact height so the screen center lands in that 57–65 inch range from the floor.
Flip-down ceiling mounts work differently. The display sits flush against the ceiling when not in use and rotates down to viewing position. These show up most often in rooms that double as training spaces or multi-purpose areas where a visible screen would be intrusive the rest of the time.
A few things to watch for with ceiling mounts. First, the pole length has to account for actual ceiling height minus the display’s own height. A 10-foot ceiling sounds like plenty of room until you factor in the mount hardware, the display panel, and the gap below needed for wheelchair accessibility. Also, the VESA mount standard applies here just like on a wall bracket — confirm your display’s VESA pattern before ordering any ceiling mount hardware.
Cable management gets messier with ceiling drops. Plan for conduit or a dedicated raceway inside the pole before the install, not after.
Motorized and Height-Adjustable Mounts
These are more common in high-end boardroom AV setups than most people realize. A motorized height-adjustable mount lets the display travel vertically on a track or telescoping arm, usually controlled by a button panel or integrated into the room’s control system — a Crestron or Extron controller, for instance.
The real use case here is mixed-use rooms. A room that runs Microsoft Teams Room meetings in the morning and in-person presentations in the afternoon has genuinely different ideal heights for those two scenarios. With a fixed mount, you’re compromising on one of them. A motorized mount lets you set presets.
From an ADA Standards for Accessible Design standpoint, motorized mounts are useful when wheelchair users need operable controls to be within reach — though the display height itself still needs to meet the minimum 48-inch bottom edge clearance. The motor doesn’t exempt you from the baseline requirement; it just gives you flexibility above it.
Cost is real. A decent motorized display lift starts around $800–$1,200 for the hardware alone, before installation. That’s before any integration with a Zoom Room or Teams Room control system. Budget accordingly.
Floor-Standing and Rolling Display Stands
A floor-standing display stand or rolling display cart is the right answer in more situations than people want to admit. Temporary setups, leased spaces where wall penetrations aren’t allowed, rooms that need the display repositioned regularly — all of these fit.
Rolling carts in particular are practical for multi-room AV sharing. One 65-inch display on a rolling display cart can serve three different conference rooms across a week’s schedule rather than buying three separate mounted displays. The tradeoff is stability — a rolling cart on carpet with a large panel can wobble during a meeting if someone bumps it.
Height matters even on rolling stands. Most adjustable floor stands let you set the display height manually, and the same screen center target (57–65 inches from floor) applies. Don’t default to the stand’s middle position and call it done. Measure from the floor to where the center of the panel actually sits and adjust from there.
For rooms using a PTZ camera on or near the display, a rolling cart complicates camera placement. The camera needs to point at participants’ faces, not track a moving display that got shifted three feet to the left between meetings. If the display is moving, the camera mount needs to move with it — which usually means attaching the camera directly to the display stand, not the wall.
Single vs. dual display configuration also matters here. A single rolling display works fine in rooms up to about 20 feet deep. Beyond that, you’re asking viewers at the back to squint at a display that’s 10–12 feet away from where it should be. Two displays on separate stands, positioned closer to each viewing zone, will serve that room better.
Common Mistakes to Avoid When Mounting a Conference Room Monitor
Most mounting errors aren’t obvious on installation day. They show up six months later — in neck complaints, bad camera angles, and meeting participants squinting at washed-out screens. Here’s what actually goes wrong and how to avoid it.
Mounting Too High “Just to Be Safe”
This is probably the most common mistake in boardroom AV setup. Someone assumes higher equals more visible, so the screen ends up at 72 or 80 inches from floor to center. That’s not safer — that’s a neck injury waiting to happen over time.
The screen center height should land between 57 and 65 inches from the floor for most standard conference room setups. Go above that range without a specific reason (like a tiered lecture hall), and you’re creating chronic discomfort for seated viewers who spend an hour staring upward.
If the room has a long table and viewers in the back need to see the display, the answer is a second screen or a larger panel — not a higher mount.
Ignoring the Seated Eye Level Baseline
Designers who are used to consumer TV placement often default to a living room mental model. That doesn’t transfer to a conference room. Seated eye level runs 42–48 inches from the floor. Your tilt mount angle, screen center position, and vertical placement all need to be calculated from that baseline — not from standing height, not from the top of the door frame.
Skip this step and everything else is guesswork.
Using a Fixed Wall Mount Bracket in a Multi-Use Room
A fixed, zero-tilt bracket might be fine in a dedicated boardroom where everyone sits at roughly the same distance and height. The moment that room doubles as a training space, a client presentation area, or a hybrid meeting room with standing participants, you’ve got a problem.
A tilt mount — even a simple manual one — gives you the flexibility to compensate for height miscalculations and changing room configurations. If the room sees genuinely variable use, a motorized height-adjustable mount is worth the extra cost. You’ll use the adjustment more than you think.
Not Accounting for the PTZ Camera Position
In a hybrid meeting room, the display height and the PTZ camera position are linked. Mount the screen too high, and in-room participants tilt their heads up to watch the display, but the camera captures them looking upward — which reads as disengaged or distracted to remote attendees. It also ruins eye contact.
The camera needs to sit as close to the center of the screen as physically possible, usually directly above or integrated into the display housing. If your mount doesn’t account for a camera shelf or VESA mount adapter for the camera unit, you’ll be improvising with zip ties and good intentions.
Forgetting the Bottom Edge Clearance
ADA Standards for Accessible Design set a minimum bottom edge clearance of 48 inches for wall-mounted objects that protrude into circulation paths. A lot of installers focus entirely on screen center height and don’t check the bottom edge until the bracket is already bolted into the wall.
Run the math before drilling. If your screen is 40 inches tall with a 60-inch center height, the bottom edge sits at 40 inches — that’s below the ADA clearance minimum and a compliance problem in any space that needs to be wheelchair accessible.
Miscalculating Screen-to-Viewer Distance
Screen size and mounting height aren’t independent variables. They depend on each other and on how far viewers are sitting from the display. The standard guidance for a 16:9 aspect ratio display is that optimal viewing distance is roughly 1.5 to 2.5 times the screen’s diagonal measurement.
Mount a 65-inch display at the right height but in a room where the closest viewer sits 4 feet away, and the image is overwhelming. Put that same display in a 25-foot-deep conference room and the back row can barely read slide text. Neither situation is a mount height problem exactly, but both get blamed on mounting.
Figure out your screen-to-viewer distance first. Then size the display accordingly. Then calculate mounting height. That’s the correct order.
Overlooking Glare Before You Finalize the Height
Ambient light control is usually thought of as a window treatment problem. It’s also a mount height problem. Dropping the screen center height by even 4–6 inches can move the reflective zone completely away from a problematic window line.
Before you commit to a final height, check the room at the time of day it’s used most. Natural light shifts. A screen that looks fine at 9am can be a glare disaster by 2pm. If you’re locked into a fixed wall mount bracket and can’t adjust later, you’ve made glare your permanent roommate.
Treating Dual Displays as Two Independent Decisions
In a single vs. dual display configuration, people often mount the second screen as an afterthought — same wall, slightly different height, slightly different tilt. That inconsistency is immediately noticeable to anyone in the room.
Both screens need to share the same center height, the same tilt angle, and ideally the same VESA mount standard bracket for visual consistency. In Microsoft Teams Room and Zoom Room certified setups, dual display positioning also has to work with the room’s camera framing and content layout logic. A mismatched pair of mounts undermines both the aesthetics and the technical function of the setup.
Not Testing Before the Install Is “Done”
Sit in every seat in the room. Look at the screen. Have someone sit in a wheelchair if ADA compliance matters for the space. Check the camera angle. Pull up a real Teams or Zoom call and see how the layout looks on both ends.
Brackets are easy to adjust when the wall anchor bolts are still fresh. They’re a genuine headache six months later when someone finally complains loudly enough to get it fixed.
Quick Reference: Conference Room TV Mounting Height Chart
Use these numbers as your starting baseline, then adjust based on your specific room geometry, seating layout, and whether you’re running a hybrid meeting room with a PTZ camera in play.
All heights are measured from the finished floor to the center of the screen.
By Room Type and Primary Use
| Room Type | Recommended Screen Center Height | Notes |
|---|---|---|
| Small huddle room (4–6 people, all seated) | 48–54 inches | Prioritize seated eye level; tilt mount essential |
| Standard conference room (8–12 people) | 54–60 inches | Mix of seated/standing viewers; 15° downward tilt helps |
| Large boardroom (12+ people, tiered seating) | 60–65 inches | Back rows need visibility; check screen-to-viewer distance |
| Training room / classroom-style | 60–68 inches | Standing presenter typical; bottom edge clearance matters |
| Executive boardroom (AV-integrated) | 57–63 inches | Often dual display config; match heights symmetrically |
| Hybrid meeting room (Teams Room / Zoom Room) | 54–60 inches | Camera placement relative to screen is as critical as height |
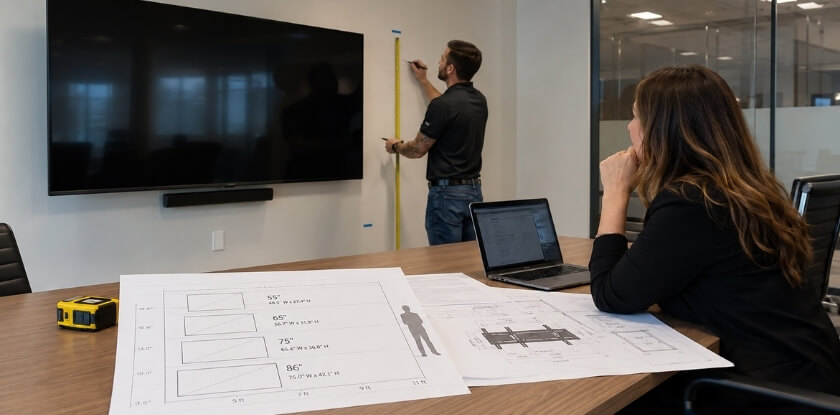
By Screen Size (Seated Conference Room, Standard 16:9 Aspect Ratio)
| Screen Size | Screen Height (approx.) | Suggested Center Mount Height |
|---|---|---|
| 55 inches | ~27 inches | 52–56 inches from floor |
| 65 inches | ~32 inches | 54–58 inches from floor |
| 75 inches | ~37 inches | 56–62 inches from floor |
| 86 inches | ~42 inches | 58–65 inches from floor |
| 98 inches | ~48 inches | 62–68 inches from floor |
Bottom edge clearance minimum stays at 48 inches regardless of screen size — this is the ADA Standards for Accessible Design threshold for forward-reach elements, and it protects wheelchair accessibility in any layout.
By Viewer Distance
Screen-to-viewer distance drives height tolerance. The further back your audience sits, the more forgiving the mounting height becomes — but vertical angle still applies.
| Viewer Distance | Comfortable Height Range (screen center) | Max Acceptable Vertical Angle |
|---|---|---|
| 6–8 feet | 48–54 inches | 10–15° downward |
| 8–12 feet | 52–60 inches | 15–20° downward |
| 12–18 feet | 56–65 inches | 15–20° downward |
| 18+ feet | 60–68 inches | Up to 25° (use tilt mount) |
Past 25 degrees, neck fatigue becomes a real issue during longer meetings. If your room geometry pushes you there, a ceiling drop-down mount or a motorized height-adjustable mount is worth the extra cost.
ADA Quick-Check
If your space needs to meet ADA compliance, run through these before finalizing your mount position:
- Bottom edge of screen: 48 inches minimum from floor
- Interactive touchscreen controls: 15–48 inches reach range per ADA Standards for Accessible Design
- Aisle width clearance around floor-standing display stands or rolling display carts: 36 inches minimum
- VESA mount bracket: confirm weight rating covers your panel — ADA doesn’t specify this, but a dropped screen is a liability issue regardless
Single vs. Dual Display
For single display configurations, center the screen on the focal wall at the heights above.
Dual display setups are different. Both screens should share the same center height, and the gap between them matters for the PTZ camera placement in hybrid setups — typically 4–6 inches between panels, with the camera mounted center-gap or above. If one screen sits higher than the other, remote participants on a Teams Room or Zoom Room call see an immediate production quality drop, and your presenter looks like they’re ignoring half the room.
Floor-Standing and Mobile Options
Not every install is a wall mount. If you’re using a floor-standing display stand or rolling display cart, the same height targets apply — you’re just adjusting the stand’s column height instead of a wall bracket position.
Most rolling display carts adjust between 50 and 70 inches to center. That covers most scenarios. Lock the height before the meeting starts. It sounds obvious. It still gets skipped.
Frequently Asked Questions
What is the standard mounting height for a conference room monitor?
The screen center should sit between 57 and 65 inches from the floor for most conference rooms with seated viewers. That range keeps the display close to seated eye level, which falls around 42–48 inches, while allowing a comfortable 15-degree downward viewing angle. Rooms with standing-height tables or mixed seating will need adjustments above that range.
How high should the bottom edge of a wall-mounted conference room display be?
Keep the bottom edge at a minimum of 48 inches from the floor. That satisfies ADA Standards for Accessible Design for mounted displays and also prevents people at the table from having their sightlines blocked by others in the room. Going lower than 48 inches creates both a compliance problem and a viewing problem simultaneously.
Does mounting height change for a dual display configuration?
Yes, slightly. With a single vs. dual display configuration, dual screens are often mounted side by side, which means the outer edges sit further from center viewers. You may need to lower the screens by 2–4 inches compared to a single screen setup to compensate for the natural head tilt that happens when viewers track between two panels. Test both sightlines before you commit to final hardware installation.
How does ADA compliance affect conference room monitor placement?
The ADA (Americans with Disabilities Act) requires that mounted displays don’t protrude more than 4 inches from the wall if the bottom edge is between 27 and 80 inches from the floor. A tilt mount or wall mount bracket that extends significantly can actually create a hazard for wheelchair users navigating the room. Check your specific mount depth, not just the screen height.
Should the monitor height change for a hybrid meeting room?
It should, yes. In a hybrid meeting room with a PTZ camera, the camera position and the display height need to work together. If participants on screen appear too high up, remote attendees end up talking to the ceiling of the physical room. Aim to position the display so remote faces appear at roughly the same height as the faces of people sitting at the table — usually that means dropping the screen 3–5 inches lower than you would in a standard presentation room.
What mounting height works for Microsoft Teams Room or Zoom Room setups?
Both Microsoft Teams Room and Zoom Room have specific layout guidelines in their certified room design documentation. Generally they recommend screen center height of 60 inches for small rooms and slightly higher for larger boardroom AV setups where rear viewers need clearance. Follow the certified design specs for your room tier — they account for camera placement and the 16:9 aspect ratio of typical content simultaneously.
Can I use a rolling display cart instead of a fixed wall mount?
A rolling display cart or floor-standing display stand works fine in rooms that host different event types. The trade-off is consistency — you’ll need to mark floor positions so the cart lands in the right spot every time, otherwise someone will inevitably park it too close or too far from viewers. Screen-to-viewer distance affects both text legibility and ergonomic monitor placement, so a cart without a fixed position defeats the purpose of calculating the right height in the first place.
What if the ceiling is very low or very high?
Low ceilings can force you below the ideal 57–65 inch screen center range. If you can’t hit 57 inches at center without cutting into clearance requirements, prioritize the 48-inch bottom edge minimum and accept a slightly lower center height. High ceilings are trickier — rooms with high ceilings often prompt installers to mount too high out of habit. A ceiling drop-down mount or motorized height-adjustable mount solves that problem by bringing the screen down to where viewers actually need it rather than leaving it floating near the ceiling.
Does screen size affect the optimal mounting height?
Bigger screens give you more flexibility because the viewing zone is taller. A 98-inch display centered at 60 inches still delivers usable sightlines to people with eye levels anywhere from 42 to 52 inches. Smaller screens — say, 55 inches — need more precise placement because there’s less vertical real estate to absorb positioning errors. VESA mount standard spacing also varies by screen size, so verify your bracket’s VESA pattern matches before finalizing height calculations on larger commercial displays.
How do I handle glare when the ideal height puts the screen in a window reflection zone?
Move the screen, not the window. A tilt mount that angles the display 5–10 degrees downward often breaks the reflection path without requiring you to change the mounting height at all. If tilt alone doesn’t solve it, glare and ambient light control through window film or motorized blinds is a better fix than pushing the monitor into an ergonomically poor position to dodge a reflection.
Final Verdict: Getting Your Conference Room Monitor Height Right
There’s no single magic number. That’s the honest answer. But there’s a right process, and if you’ve followed the calculations in this guide, you already have what you need to land on a height that actually works for your room.
Here’s the short version: center the screen between 57 and 65 inches from the floor, keep the bottom edge at or above 48 inches for wheelchair accessibility under ADA Standards for Accessible Design, and tilt the display downward no more than 15 degrees if you’re mounting above true eye level. Seated eye level runs 42–48 inches off the floor — that’s your anchor point for every calculation.
The Variables That Override the Defaults
Room depth changes everything. A screen that works perfectly in a 12-foot huddle room will be too low in a 30-foot boardroom AV setup where back-row viewers need a higher sight line. Always calculate screen-to-viewer distance first, then work backward to height.
Your seating layout matters just as much. Fixed seats in a formal conference configuration give you a predictable eye-level range. Flexible seating, standing-height collaboration tables, or a hybrid meeting room where remote participants share screen real estate with a PTZ camera — all of these shift the target zone.
If you’re running a Microsoft Teams Room or Zoom Room configuration with a dual display setup, the primary content display and the secondary people/video display don’t need to be at the same height. The content screen typically sits higher; the camera-adjacent display should align closer to seated eye level so remote participants feel like they’re making eye contact.
One Decision You Shouldn’t Skip
Choose your mount type before you finalize height. A fixed wall mount bracket locks you in permanently. A tilt mount gives you a few degrees of correction if the install lands slightly off. A motorized height-adjustable mount costs more but solves the problem entirely for rooms with mixed seated and standing use. If the room setup changes frequently, a rolling display cart or floor-standing display stand gives you the flexibility no fixed mount can.
Don’t spec the VESA mount pattern after the fact either. Confirm the display’s VESA mount standard compatibility before purchasing hardware — a mismatch discovered on install day wastes hours.
What Good Actually Looks Like
Nobody in the room is craning their neck. Nobody’s squinting through glare off a window behind the screen. People seated at the far end of the table can read slide text without leaning forward. The camera on the display or above it captures faces, not foreheads. That’s the benchmark.
Get those four things right and the exact inch measurement matters a lot less than you’d think. The math in this guide gets you close. Walking the room with a measuring tape and a colleague sitting in the actual chairs closes the gap.
Mount it right the first time. Adjusting a bolted display after the fact — through drywall, into studs, with cable management already finished — is a much worse afternoon than spending an extra 20 minutes on measurements before the drill comes out.